this journal entry is intended to provide an in-depth description for my work, daybreak fantasy
sources for elements employed are cited as recalled.
most images are linked to detailed (sometimes larger) views. FIRST & FOREMOST: i am working here with a six year old acer notebook computer which is barely adequate to the task.
over time, i have learned to do a lot of
problem solving, developing
work-around solutions to compensate for the limitations of the hardware and software at my disposal.
THE INSPIRATION: as i have indicated elsewhere, i've had a long-held appreciation for the works of Maxfield Parrish.
wiki my earlier homage to his work,
a la maxfield parrish

was executed entirely from memory.
for this work, however, i kept an image of his original painting,
daybreak, available as reference.
1. GENERATING 3D MODELS with POSER 5, (my computer is not capable of handling more recent versions,)
figure elements are created:
a background environment utilizing DAZ's
MPCyclorama:

a neo-classical "temple" set, borrowing the ground element from DAZ's
Telrunya and the columns element from (un-recalled source)
Gothic Spa:
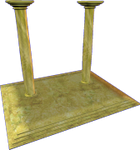
(personally customized textures)
a "firelizard" morphed from DAZ's
Millenium Dragon with application of Lyrra's
Dragon Jewels (topaz, in this case) custom textures:

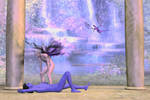
my "rodfae" figure originally created for my "moonlit fantasy" images: DAZ's
M3 with personally customized morphs and textures, DAZ's
Classic Fairy Wings, and DAZ's
Markus Hair:

and finally, a modified version of my "gothfae" figure, originally created for works i've only recently realized i've not uploaded to dA; DAZ's
M3 with personally customized morphs and textures, and DAZ's
Wedge-cut 2 Hair:
 2. SETTING THE SCENE & GENERATING RENDERS:
 still in POSER 5, all of the figure elements are positioned/arranged, lighting and camera angles are set:

multiple renders (for reasons which will become apparent as this journal entry progresses,) are generated.
first, only the background environment is visible:

next,
matte reference images (renders without textures and bump maps applied to figures and no shadows, set against a solid color background,) and
background reference images (renders with textures, bump maps and shadows, using the initial background environment render as a background image,) are generated for selected remaining figure elements;
matte reference examples:
 background reference
 example:

(figures which might cast shadows upon the desired figure are included in these renders)
3. GENERATING MATTES AND OBJECT LAYERS switching now to COREL PHOTO-PAINT,
matte masks are generated from matte reference images:


the resulting masks are used to "lift" elements from background reference images to be brought together as layer objects in a new image:

this provides the ability to adjust qualities of individual elements employed.
in particular, it helps me work-around depth-of-field aka depth-of-focus issues.
all objects are combined with the background and the resulting image is copied to the clipboard
4. CONVERSIONS
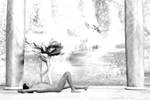
the image is next imported from the clipboard into FOTOSKETCHER:

where it is converted into both a watercoler styled image, and a pencil sketch styled image:
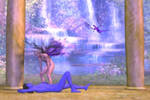
5. GENERATING THE FINAL IMAGE:
back in COREL PHOTO-PAINT, the output from the previous step are brought together as object layers:

blur, hue, tone, and opacity qualities of the object layers are manipulated and they are all combined with the background.
i, personally, am quite pleased with this work ... thank you for your attention,
feadil